Titanium alloy materials and welding specifications.
- Share
- Issue Time
- Nov 9,2021
Summary
Titanium alloy materials and welding specifications.For example:how to weld titanium pipe?

Titanium alloy plate
One,Scope of application
1. The provisions of this section apply to titanium alloy plates with a thickness of 3mm and above for ships or marine engineering.
2. If titanium alloy plates other than those specified in this section are used, their chemical composition, mechanical properties, and applications should be submitted to CCS for review. After approval, they can be accepted in accordance with relevant recognized standards.
Two,Manufacturing
1. Titanium alloy plates are to be produced by factories approved by CCS.
2. In addition to the provisions of this section, the manufacture and testing of titanium alloys are to comply with the relevant provisions of Chapters 1 and 2 of this PART.
3. The smelting of titanium alloy should be carried out under vacuum conditions. If a vacuum consumable furnace is used for remelting smelting, the consumable electrode must not be welded by argon tungsten arc welding, and the number of smelting should be no less than 2 times to ensure the chemical uniformity of the material.
4. Titanium alloy plates should usually be manufactured by rolling.
Three,Surface quality
1. The surface of the board should not have any defects that affect the use, such as cracks, peeling, oxide skin, wrinkles, metal or non-metallic inclusions, traces of alkaline washing, etc.
2. The product edge of the titanium alloy plate should be flush and free of burrs, and the overall dimensions and tolerance range should meet the relevant technical conditions accepted by CCS.
3. Slight surface defects are allowed to be removed by grinding. Grinding should generally be carried out in the rolling direction, and the polished surface should form a smooth transition, and the thickness should not be less than the minimum thickness specified by the technical conditions. It is not allowed to use welding repair method to repair surface defects.
Four,chemical composition
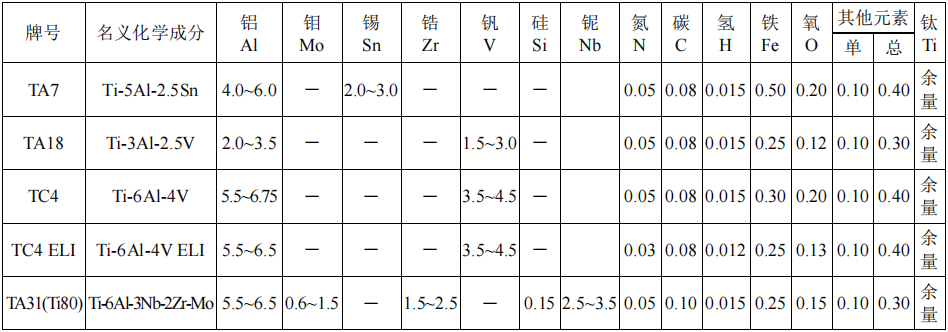
Titanium alloy ingot factory shall conduct smelting chemical composition analysis for each furnace product. The chemical composition should meet the requirements of Table 1.
Table 1 Chemical composition of titanium alloy (%)

Note: The data in the table are the highest limits except for the interval.
Five,Mechanical properties
1. At least 1 sheet should be taken from each batch (the same heat number, the same manufacturing method, the same thickness, and the same heat treatment heat) of plates (when there are more than 4 plates in the batch, 2 plates should be taken). Cut a sample from the end of the board about 1/4 of the board width from the edge of the board.
2. One tensile test specimen and one group of three Charpy impact test specimens (for plate thickness greater than 10mm) and two bending test specimens shall be prepared from each sample as follows:
(1) Tensile specimens are to be the plate-like proportional specimens of serial number 1 in Table 2.2.2.1 of Chapter 2 of this PART (but the specimen width can be 12.5mm P7 specimens); the serial number can also be used for thickness greater than 40mm 2 round rod-shaped proportional sample (but the sample diameter can be 5mm), at this time the axis of the sample should be located at 1/4 of the thickness of the plate;
(2) When the thickness of the plate is not more than 40mm, the impact sample should be no more than 2mm from the edge of the sample to the rolling surface of the plate; if the thickness of the product exceeds 40mm, the axis of the sample should be located at 1/4 of the thickness of the plate . The axis of the sample should be perpendicular to the rolling direction, and the notch of the sample should be perpendicular to the rolling surface;
(3) The tension surface of the two bending specimens should maintain at least one original rolling surface, and the axis should be perpendicular to the rolling direction. The width of the sample is 15mm. For plates with a thickness of more than 5mm, the thickness can be reduced to 5mm on one side.
3. Specimen preparation and testing of mechanical properties are to be carried out in accordance with the relevant regulations in Chapter 2 of this PART. The bending test is to subject both rolling surfaces of the plate to the test.
4. The mechanical properties of titanium alloys should meet the requirements of Table 2.
Table 2 Mechanical properties of titanium alloy

Six,Non-destructive testing
1. If the contract stipulates that the board shall be subjected to non-destructive testing, the non-destructive testing shall be carried out in accordance with the contract requirements.
Seven,Mark and certificate
1. The plate manufacturer shall clearly mark the CCS inspection mark and the following marks at one position for each piece of titanium plate (thin plates can be stacked and packaged) that have passed the inspection:
(1) The name of the manufacturer;
(2) Material grade and delivery status;
(3) The serial number or abbreviation that can trace the entire production process of titanium materials;
(4) If the ordering party requires it, it can be marked with the order contract number or other identification marks.
2. Each batch of boards should be accompanied by a certificate of conformity for the materials. The certificate of conformity shall include at least the following contents:
(1) The name of the ordering party and the contract number;
(2) Material grade, furnace batch number and delivery status;
(3) Specification and quantity of materials;
(4) Material chemical composition and mechanical properties.
Titanium and titanium alloy tube
One,General provisions
1. The provisions of this section apply to titanium and titanium alloy pipes for general use in ships and marine engineering.
2. For titanium and titanium alloy pipes other than those specified in this section, their chemical composition, mechanical properties, and application should be submitted to CCS for review. After approval, they can be accepted in accordance with relevant recognized standards.
Two,Manufacturing
1. Titanium and titanium alloy pipes are to be produced by factories approved by CCS.
2. In addition to the provisions of this section, the manufacture and testing of titanium alloy pipes are to comply with the relevant provisions of Chapter 1, Chapter 2 and Chapter 4 of this PART.
3. The smelting of titanium and titanium alloys should be carried out under vacuum conditions. If a vacuum consumable furnace is used for remelting smelting, two or more remelting processes should be used to ensure the uniformity of the chemical composition and structure of the material, and reduce the level of oxidation and nitriding inclusions.
4. Titanium alloy tubes can be manufactured by rolling, welding or welding and rolling.
5. The welded pipe can be formed by TIG welding or MIG welding after coiling in an annealed rolled strip. If filling materials are required, the filling materials used should be compatible with the base material.
6. The manufacturing quality of titanium and titanium alloy pipes is to comply with the relevant requirements of 4.1.3 in Chapter 4 of this PART of the Rules.
Three,Heat treatment
1. Unless otherwise specified in the contract, titanium and titanium alloy tubes shall be delivered in annealed state.
2. For cold-rolled pipes, annealing should usually be carried out at a temperature not lower than 540°C; for hot-worked pipes, if the processing end temperature is not lower than 760°C, no further heat treatment is necessary.
Four,chemical composition
Titanium alloy ingot factory shall conduct smelting chemical composition analysis for each furnace product. The chemical composition should meet the requirements of Table 3.
Table 3 Chemical composition of titanium and titanium alloy tubes (%)

Note: The data in the table are the highest limits except for the interval.
Five,Mechanical properties
1. Titanium tubes and titanium alloy tubes can be inspected and tested in batches. Each batch of pipes should be composed of titanium pipes with the same heat number, the same manufacturing method, the same specification, and the same heat treatment furnace.
At least 2 pipes shall be randomly selected at a rate of 2% from each batch of pipes, and the sampling test shall be carried out according to the following requirements:
(1) Take one tensile sample and one flattened sample for each tube;
(2) When required by the ordering party, one bend sample shall be taken from each tube.
2. The specimens and tests for tensile and flattening tests are to comply with the relevant requirements in Chapter 2 of this PART. In the flattening test, when the pipe diameter is less than or equal to 25.4mm, the flattening coefficient is taken as 0.04; when the pipe diameter is greater than 25.4mm, the flattening coefficient is taken as 0.06. For TA10 alloy, the flattening coefficient is taken as 0.04.
3. The mechanical properties of titanium and titanium alloy pipes should meet the requirements of Table 4.
Table 4 Mechanical properties of titanium and titanium alloy tubes

Six,Non-destructive testing and hydraulic testing
1. All titanium and titanium alloy pipes shall be subjected to non-destructive testing and hydraulic tests in the manufacturer.
2. Non-destructive testing can be conducted in accordance with recognized standards (such as GB/T 12969) for eddy current or ultrasonic testing.
3. If there is no contract stipulation, the pressure of the hydraulic test can be determined according to the following formula. But generally, the test pressure does not need to exceed 17.2 MPa for pipes with a diameter of no more than 76 mm; for pipes with a diameter of more than 76 mm, the test pressure does not need to exceed 19.3 MPa.

In the formula: P ――Test pressure, MPa;
K ――The test pressure coefficient is 1 for seamless pipes and 0.85 for welded pipes;
S ――The allowable stress of the pipe is generally 50% of the minimum non-proportional elongation strength specified by the material, MPa;
T ――tube wall thickness, mm;
D――the nominal outer diameter of the tube, mm.
4. During the hydraulic test, the test pressure should be maintained for at least 5s, and the pipe should be free of distortion or leakage.
Seven, Mark and certificate
1. The manufacturer shall clearly mark the CCS mark and the following marks on each titanium pipe or titanium alloy pipe that has passed the inspection:
(1) The name or trademark of the manufacturer;
(2) The grade and specification of the material;
(3) A serial number or abbreviation that can trace the entire production process of titanium pipes.
2. Each batch of tubes should be accompanied by a certificate of conformity for the materials. The certificate of conformity shall include at least the following contents:
(1) The name of the ordering party and the contract number;
(2) Material grade, furnace batch number and delivery status;
(3) Specification and quantity of materials;
(4) Material chemical composition and mechanical properties.